Using Netlify Identity with Intercom's identity verification
Installing the Intercom Messenger on a Netlify site isn’t that complicated—just add the snippet to the end of your app or website’s main layout.

But Intercom also offers additional attributes on the
window.intercomSettings object. Indeed, you can tell
Intercom which user is currently signed-in:
window.intercomSettings = {
  app_id: "t8m7a9ed", // Your app ID
  name: "Jane Doe",
  email: "[email protected]",
  created_at: "1587848938",
}
Instead of email, you can also pass a user_id.
You can easily pass in your Netlify Identity user, as well. Instead of
using window.intercomSettings, use the
Intercom('boot', settings) API:
netlifyIdentity.on("init", async user => {
  if (user) {
    Intercom("boot", {
      app_id: "t8m7a9ed",
      email: user.email,
      user_id: user.id,
    })
  } else {
    Intercom("boot", {
      app_id: "t8m7a9ed",
    })
  }
})
This is assuming you use the Netlify Identity widget.
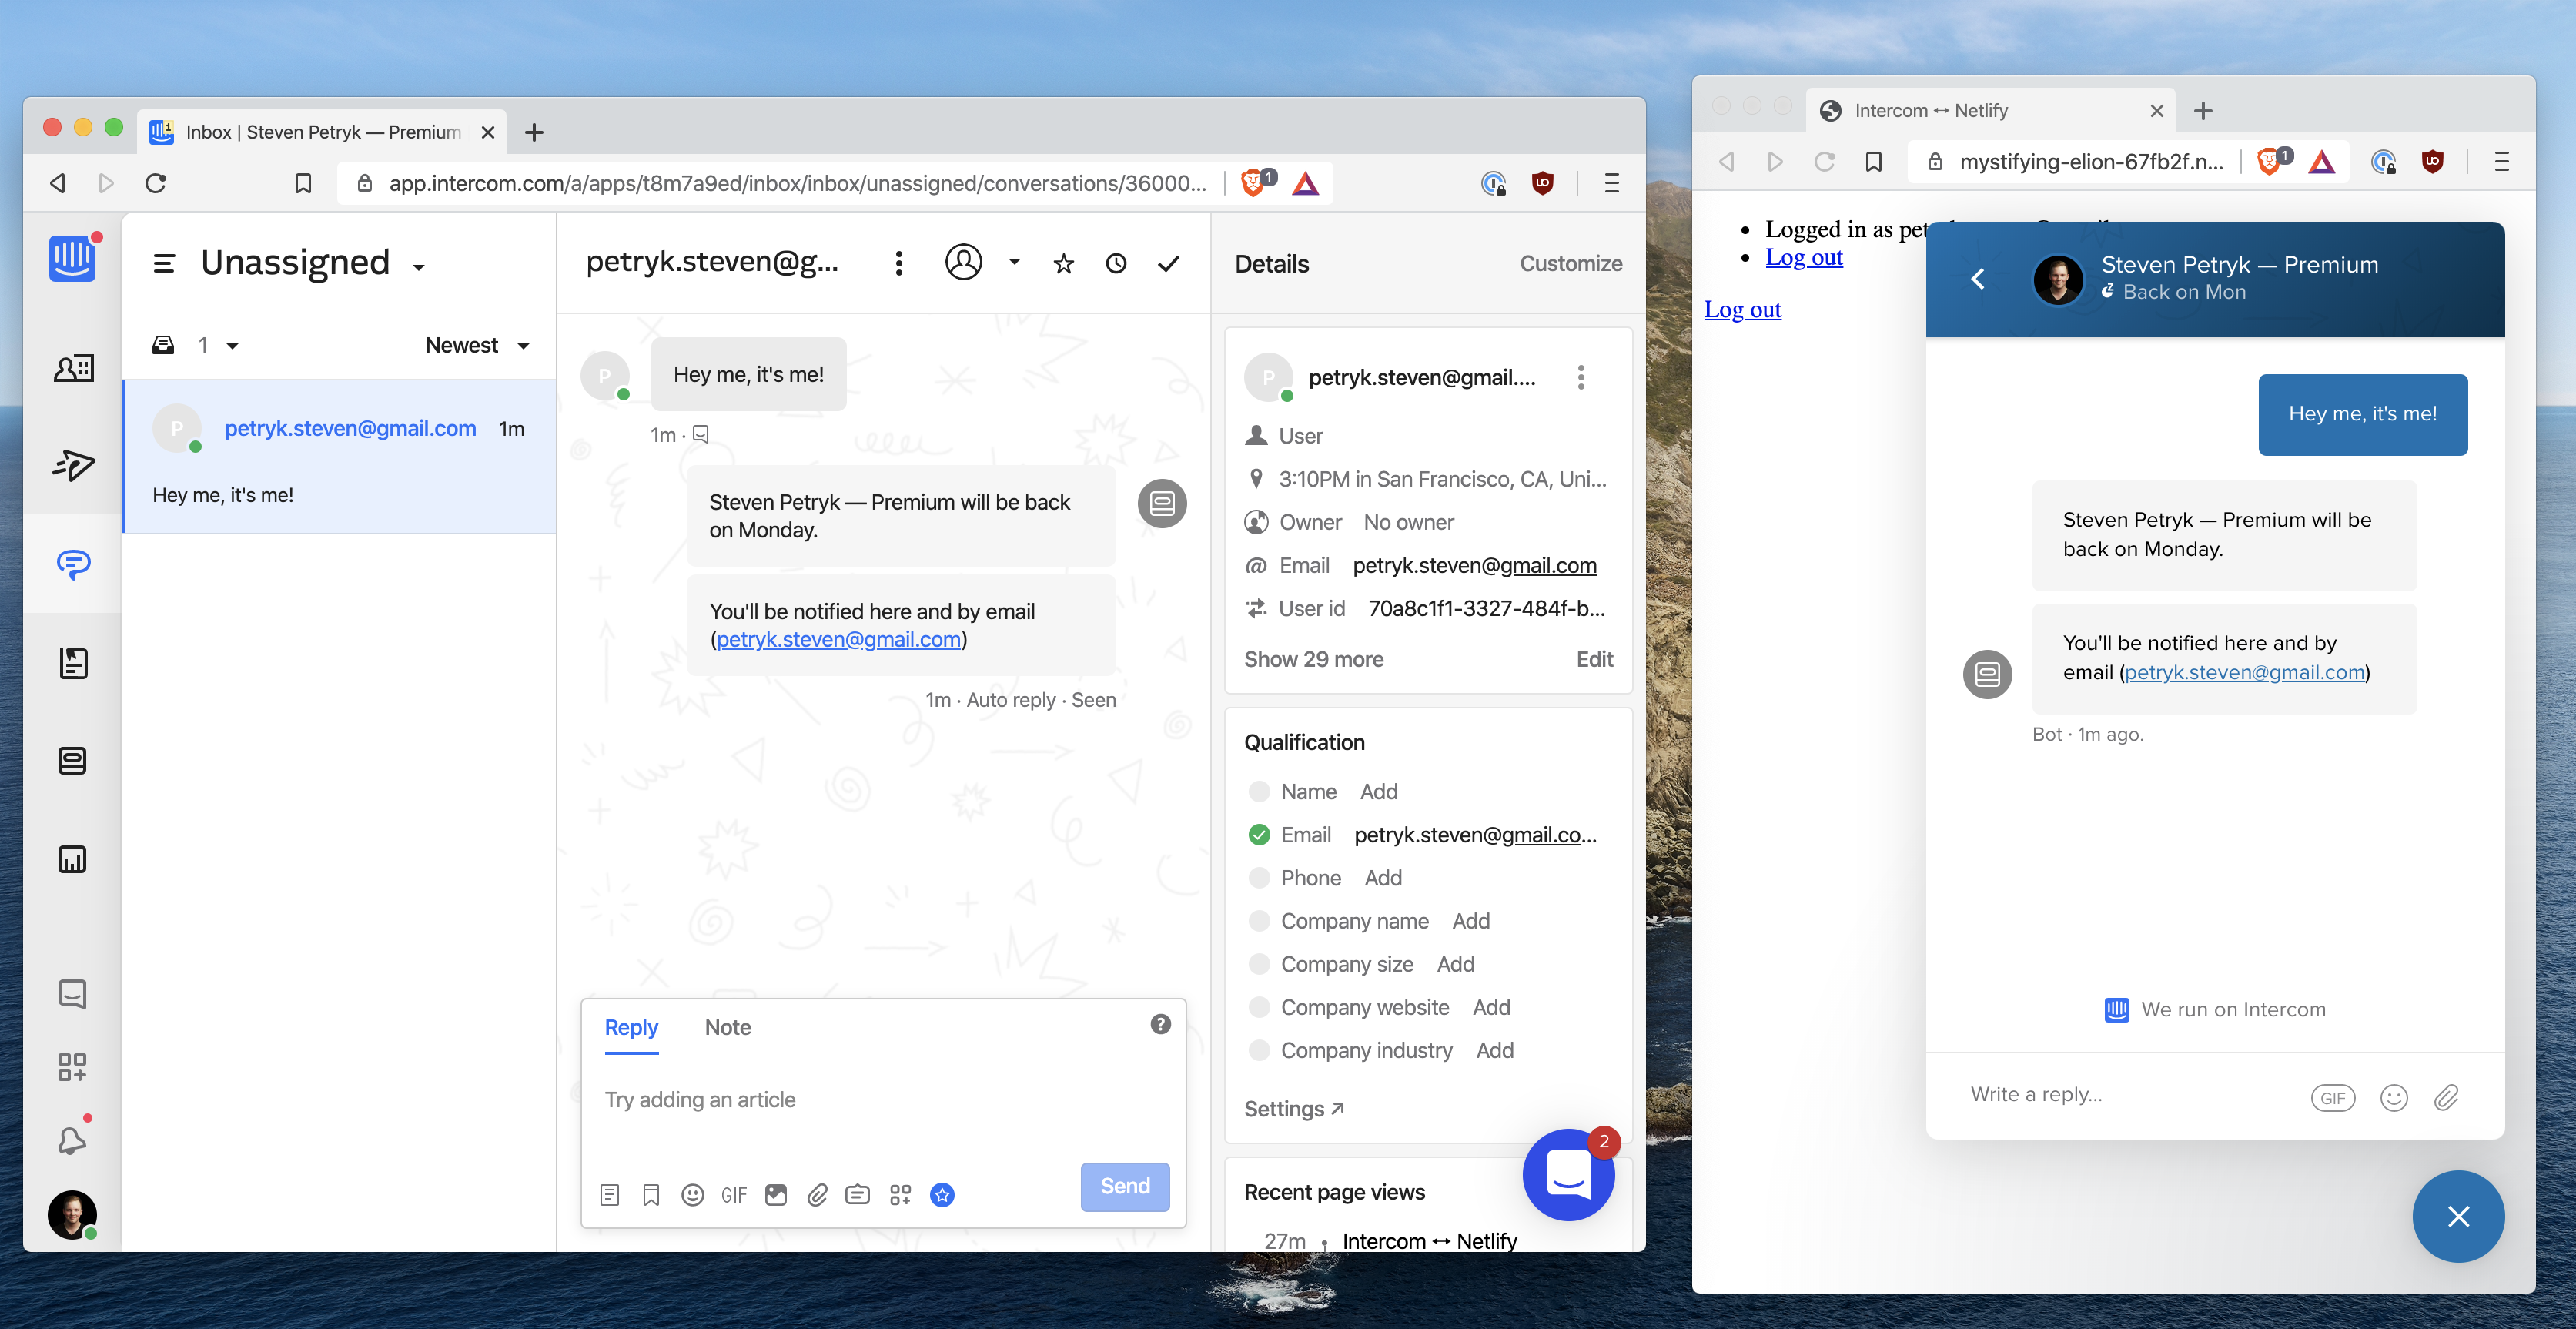
This is handy, because your Intercom teammates will be able to see which end-user is chatting in on the Messenger. It will always reflect the currently signed in user.
The problem
But there’s a security risk here: any user could pretend to be any other
user just by running Intercom('boot', ...) in the browser
console. That’s why Intercom supports
Identity Verification: your server must compute a cryptographic hash of the user’s ID using
a secret key that only you and Intercom know. The secret key can’t be on
the client side, because then anybody visiting your site can see it. The
hash must be computed on the server side and then passed to the
client side.
We don’t have a server side, but since we’re on Netlify, we do have Netlify Functions, which can run any code they want. What’s more, they have full access to Netlify Identity, so we can make sure users aren’t imitating one another when we compute their Identity Verification hash.
Intercom’s documentation shows some Ruby code in their example of how to calculate the hash:

We can do the same thing in Node. As a quick proof of concept, run the following code:
const crypto = require("crypto")

const userHash = crypto
  .createHmac("sha256", "<secret key>")
  .update("123")
  .digest("hex")

console.log(userHash)
You should see a hexadecimal hash logged to the console. You can check that it’s right using Intercom’s hash verification tool, linked near the top of the Identity Verification settings page.
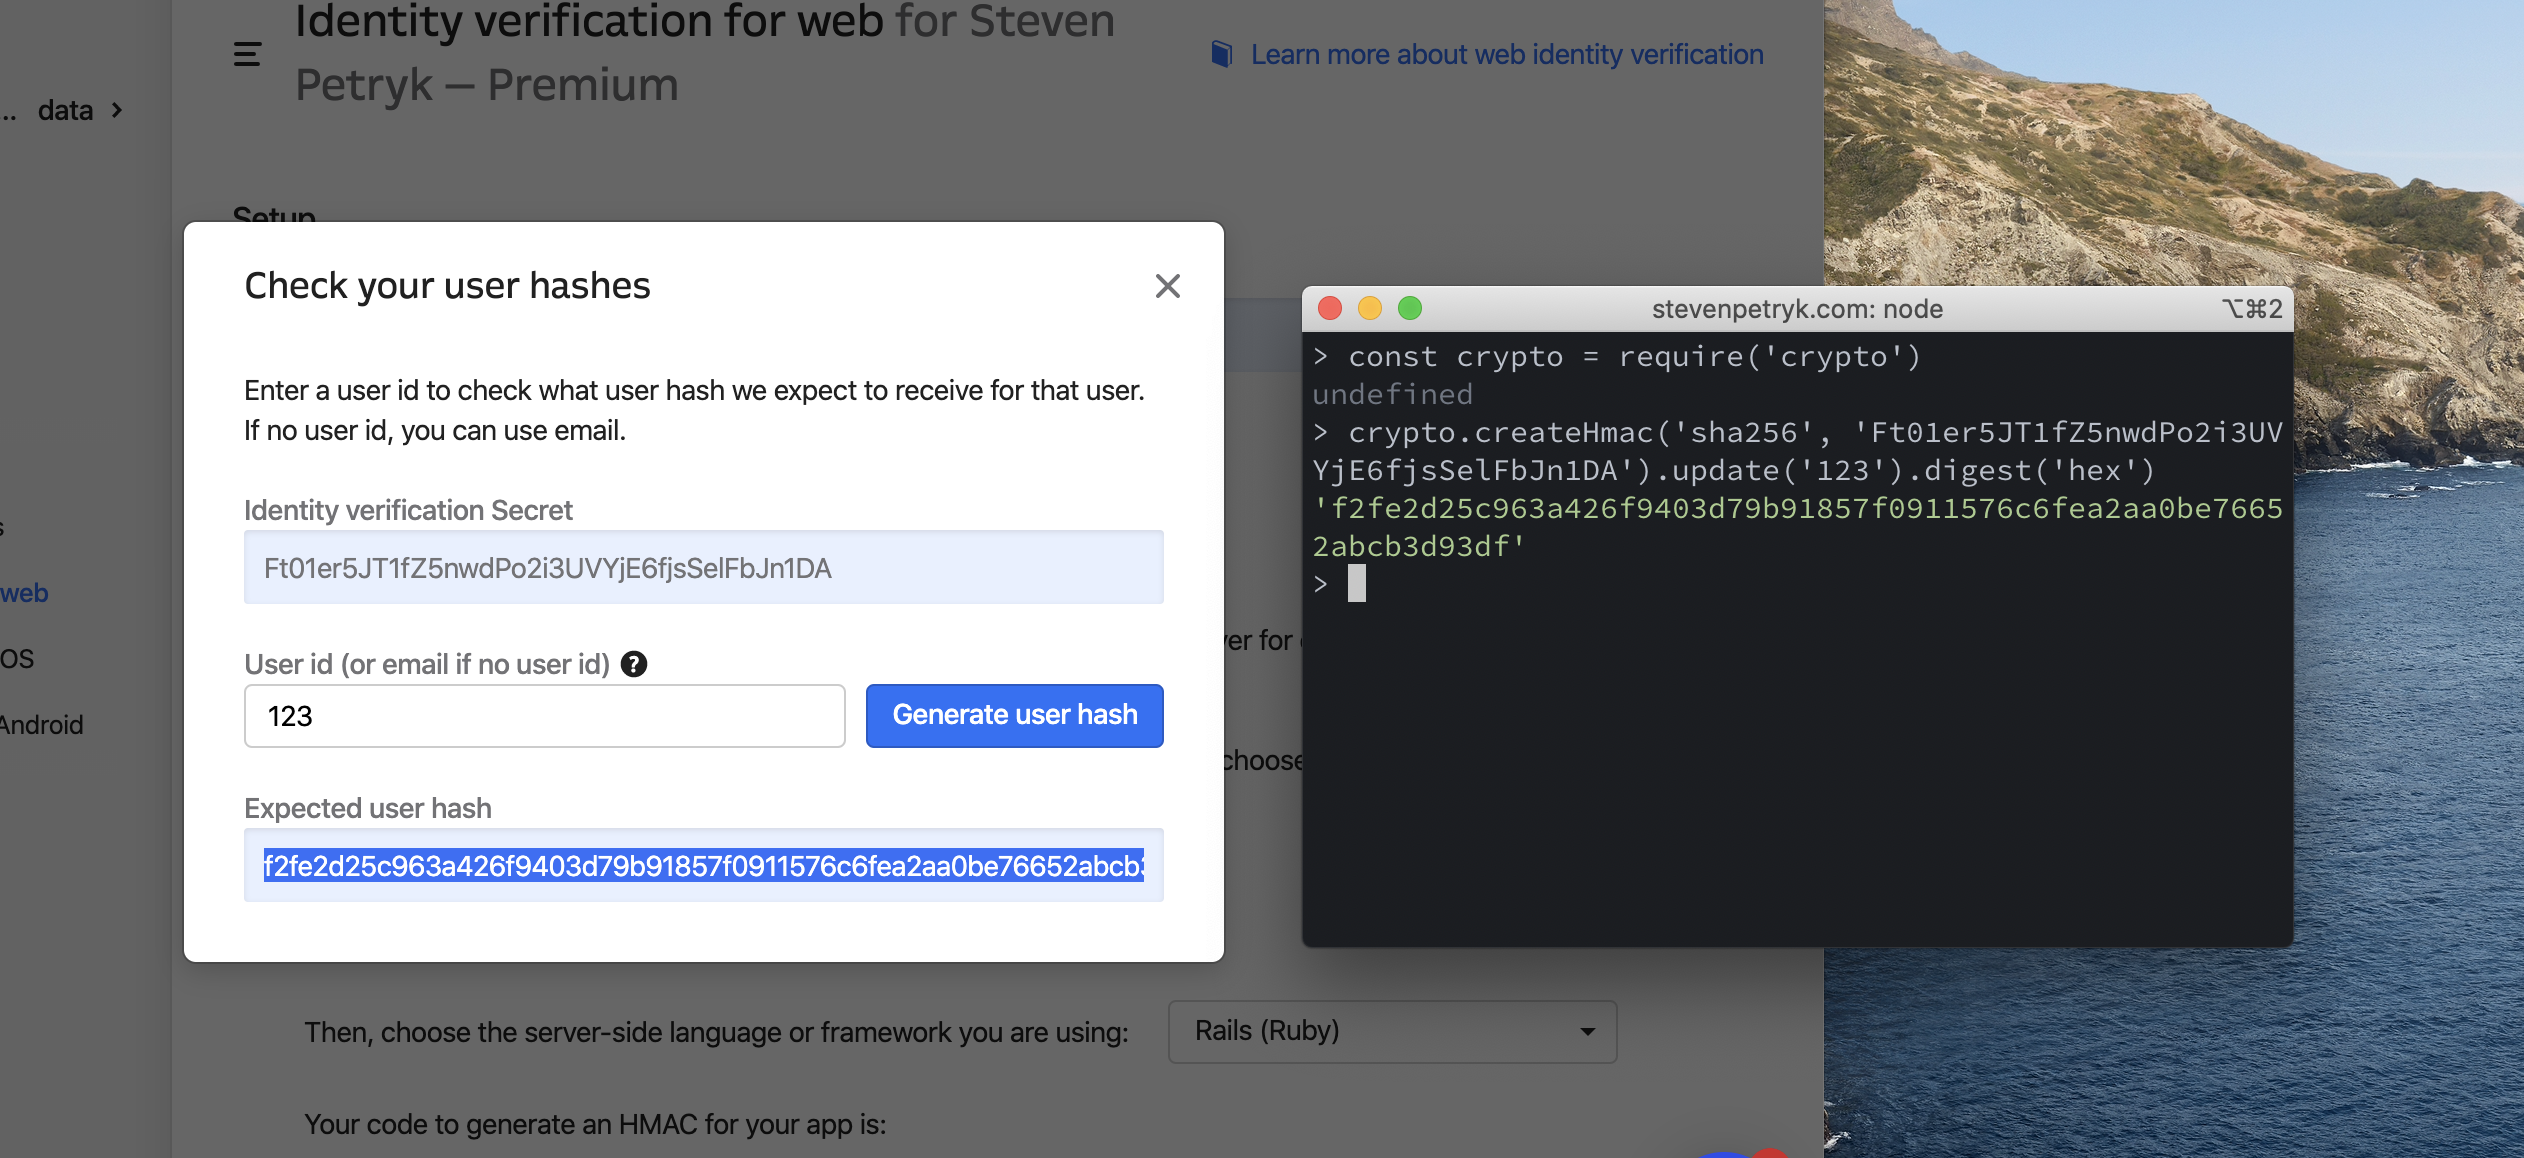
We have a match! That means our function is working properly.
The Netlify Function
Let’s turn this into a Netlify Function. First, follow the guide to
set up Netlify Functions
if you haven’t already—I’ll assume your folder is named
functions.
Create a new file at functions/intercom-hash.js, and add
the following:
const crypto = require("crypto")

const { INTERCOM_IDENTITY_VERIFICATION_SECRET } = process.env

exports.handler = function(event, context, callback) {
  const userHash = crypto
    .createHmac("sha256", INTERCOM_IDENTITY_VERIFICATION_SECRET)
    .update(context.clientContext.user.sub)
    .digest("hex")

  callback(null, { statusCode: 200, body: userHash })
}
The first thing to note is that, if we properly structure our request
from the frontend with the user’s Netlify Identity credentials, then
this Netlify Function can access the entire user object via
context.clientContext.user. If authentication fails,
context.clientContext.user will be undefined.
Also, we’ve stored our Identity Verification secret key from Intercom as a Netlify build variable. This is a good practice because it keeps secrets out of the source code (and out of git).
Sending the hash to Intercom
The hash is sent to Intercom via the user_hash property in
our JavaScript. Let’s adjust our Intercom setup code to make a call to
our Netlify function before booting Intercom. We’ll also extract the
user/no-user logic out into separate function calls:
netlifyIdentity.on("init", user => {
  if (user) {
    bootIntercomForUser(user)
  } else {
    bootIntercom()
  }
})

async function bootIntercomForUser(user) {
  const endpoint = "/.netlify/functions/intercom-hash"
  const authorization = `Bearer ${user.token.access_token}`
  const response = await fetch(endpoint, { headers: { authorization } })
  const userHash = await response.text()

  Intercom("boot", {
    app_id: "t8m7a9ed",
    user_id: user.id,
    email: user.email,
    user_hash: userHash,
  })
}

function bootIntercom() {
  Intercom("boot", {
    app_id: "t8m7a9ed",
  })
}
Since we’ve passed the
Authorization: Bearer <token> header to our Netlify
Function, the user gets authenticated by Netlify Identity for us. In
response, our function sends back the computed user hash for Intercom.
Note that this only guarantees your user’s id being correct to
Intercom. Alternatively, you can HMAC their email and
Intercom will verify their email. Choose which one you want to protect,
because you can’t protect both.
The Intercom Messenger will emit warnings in the console if you messed anything up. If not, you’re all set! You now have Intercom integrated with Netlify in a simple and secure way. 🕶
Next steps
- Check out the example repo.
- Add users’ full names as Netlify Identity metadata, then pass them to Intercom, for a more personal experience!
- Follow me on Twitter if you want to hear more from me. I work for Intercom, so feel free to send feedback on any part of this process 😄